SOLAR STATION Live – manual
SOLAR STATION Live is designed to connect to your inverter automatically, without any manual configuration.
If SOLAR STATION Live does not find a compatible WiFi network, it will show a selection menu with all available WiFi networks. Select your inverter's network.
Select the correct inverter and enter the WiFi password if required. SOLAR STATION Live stores the password and reconnects automatically next time.
Firmware update SOLAR STATION Live
First, check which version of SOLAR STATION Live you have. The version number (e.g. 123) is shown on the startup screen in the bottom left corner.
What you will need
- Computer – Windows, macOS or Linux
- USB-C cable – must be a data cable (not charging-only)
- Browser – Chrome or Microsoft Edge
Update procedure
- Connect SOLAR STATION Live to your computer using a USB-C cable.
- Open the update page (link below) and click the Connect button.
- In the dialog, select the serial port (usually contains "usb serial").
- Choose Install Solar Station Live and wait for completion (a few minutes).
- Once finished, SOLAR STATION Live is ready to use.
How do I identify my SOLAR STATION Live generation?
The 1st generation can be identified by 4 screws on the back. The 2nd generation has no screws on the back. Firmware for both generations is different (different display driver), but if you accidentally flash the wrong firmware, you can simply flash the correct one – nothing will be damaged.
- 1st generation: Update here
- 2nd generation: Update here
Displayed data
The display of SOLAR STATION Live is divided into clear sections. The following image shows the main screen layout:
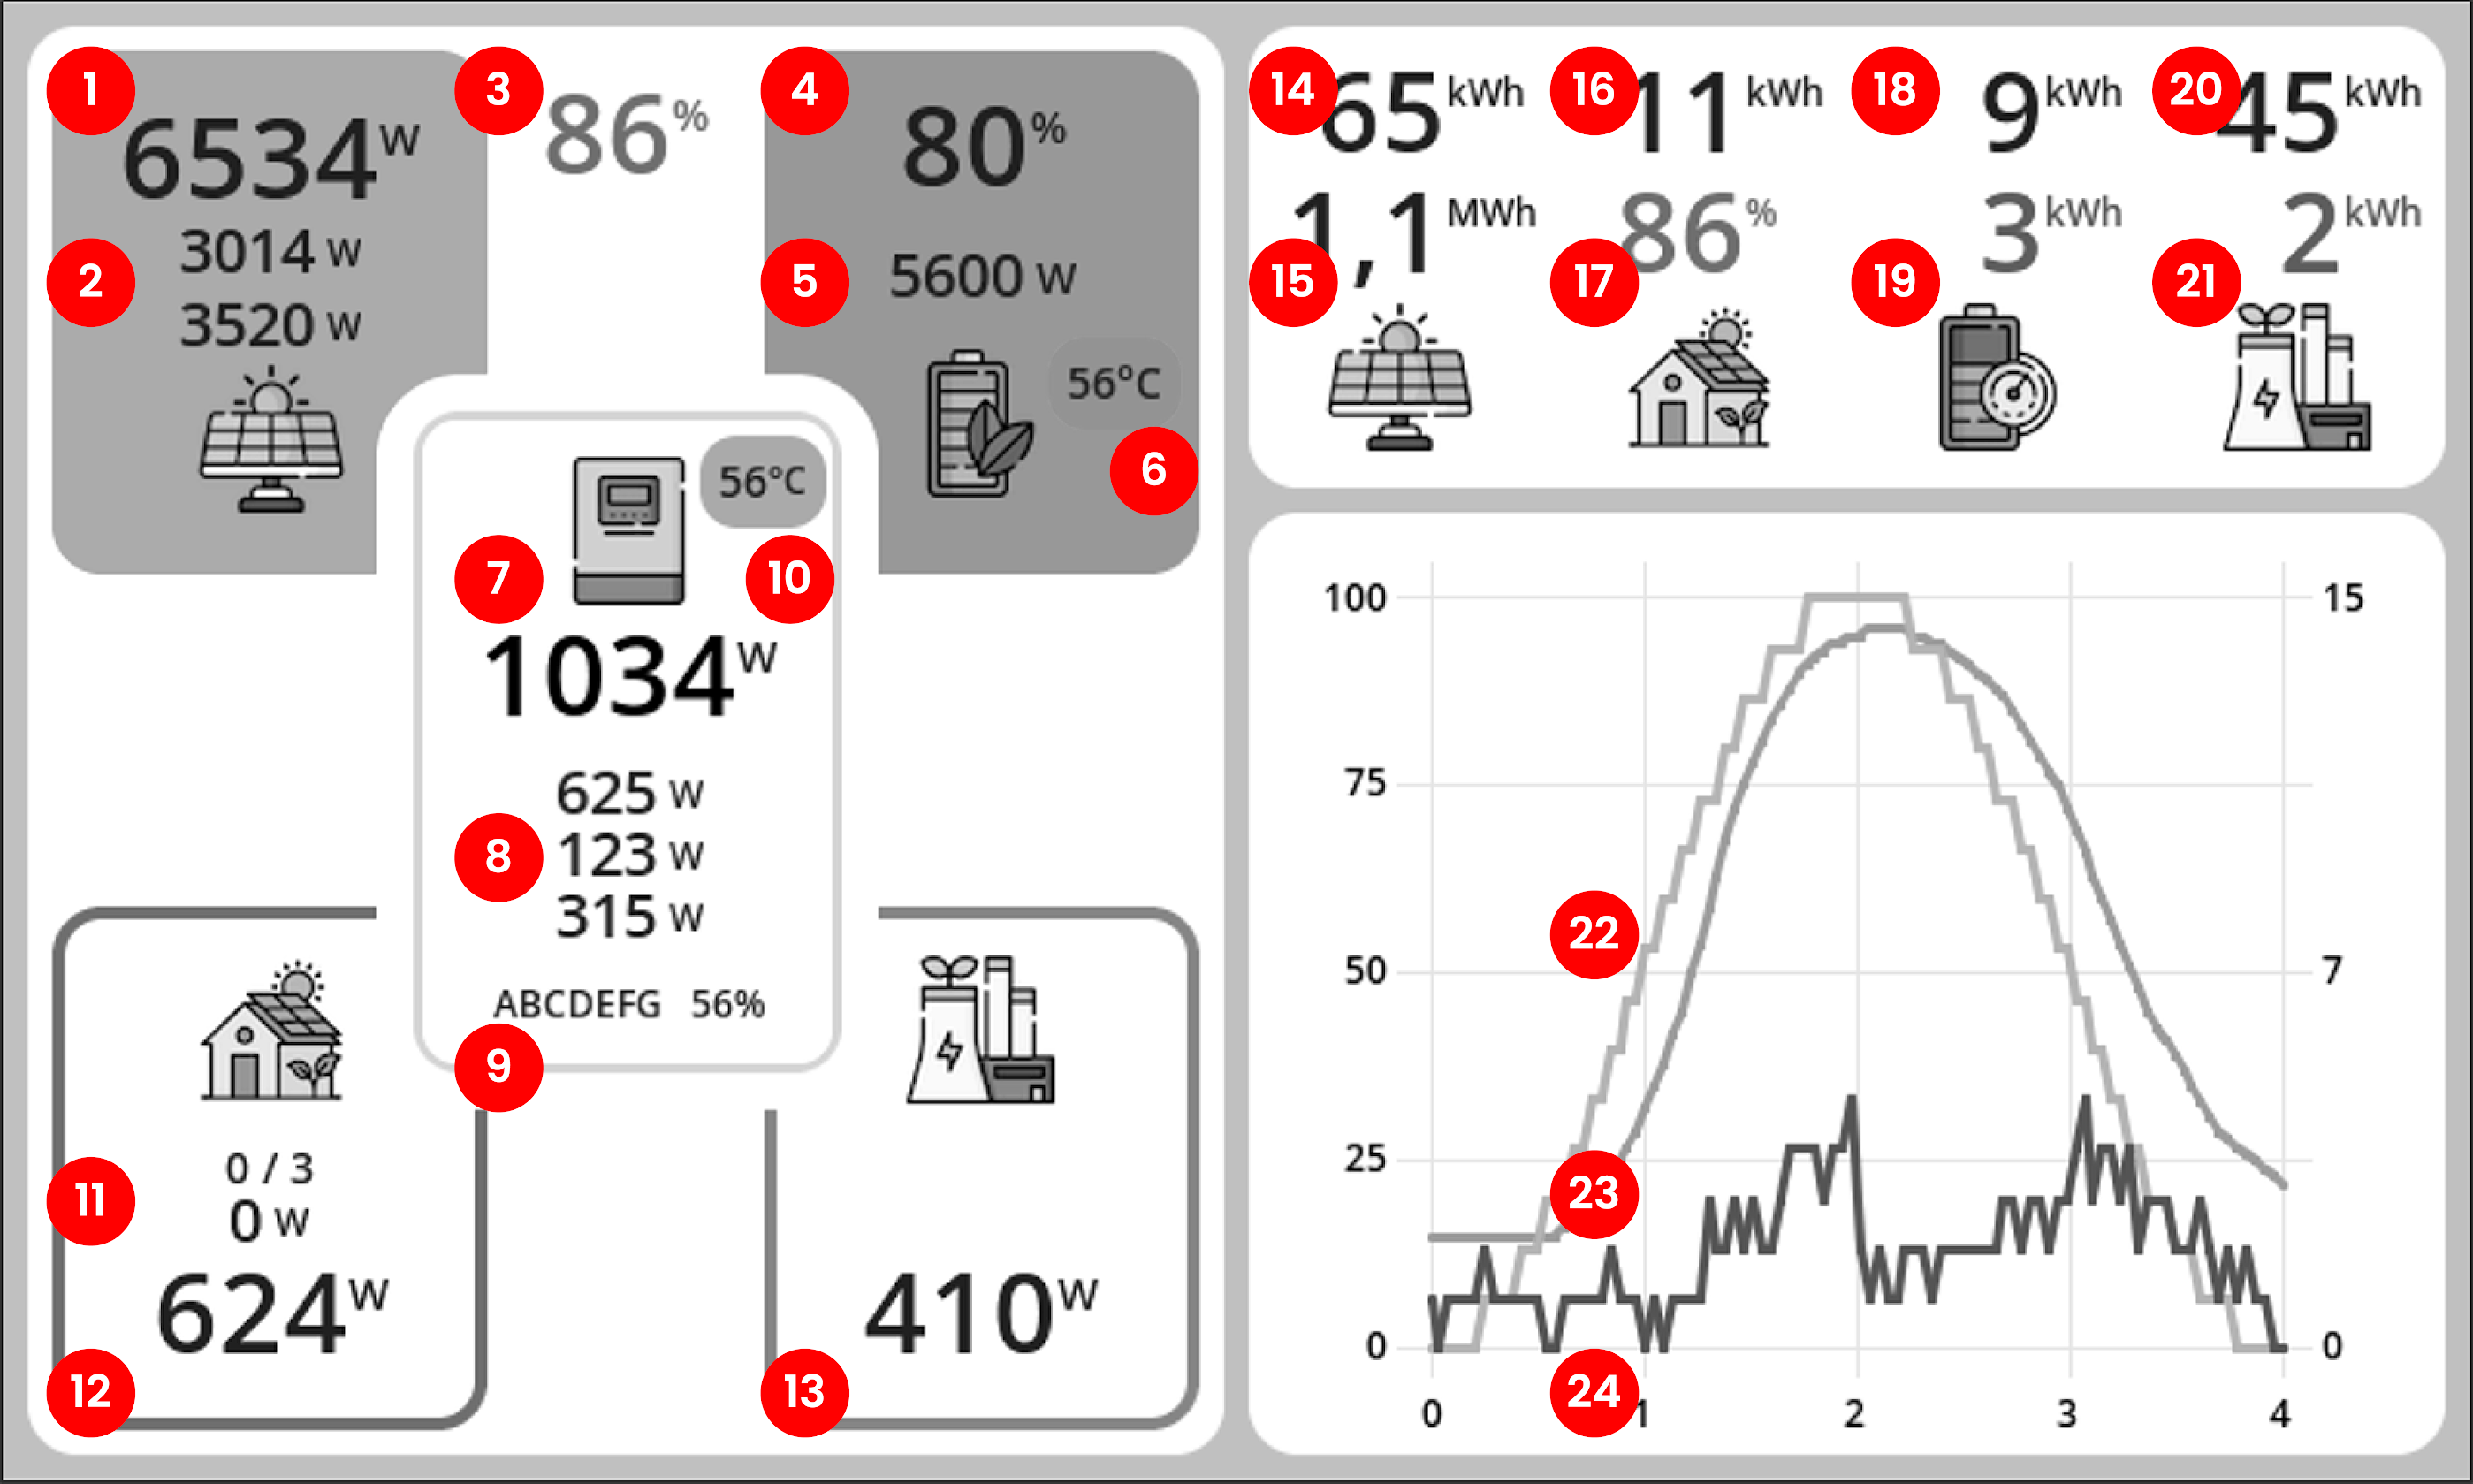
- Current PV array output
- String power (if available)
- Self-consumption ratio from solar energy
- Battery state of charge
- Battery charging/discharging power
- Battery temperature
- Total inverter power
- Load on each inverter phase (overloaded phase highlighted in red). A negative value indicates reverse power flow – typically when the battery is charged from the grid.
- Inverter serial number and WiFi signal strength
- Inverter temperature
- Number of active and paired SOLAR PLUG sockets (total power of switched-on sockets)
- Total household consumption
- Power imported from and exported to the grid
- Today’s PV production
- Total production since installation
- Today’s electricity consumption
- Today’s self-consumption ratio
- Today’s energy stored into the battery
- Today’s energy taken from the battery
- Today’s export to the grid
- Today’s import from the grid
- Graph of PV production (yellow), battery state of charge (blue) and household consumption (green).
Some daily statistics show zeros after startup for certain inverters (Victron, GoodWe). This is because the inverter does not provide these daily counters. SOLAR STATION Live calculates them itself from total counters, so they become valid after midnight.
Connection to inverter
The station connects automatically if it finds exactly one supported dongle and has all required credentials. After a restart it will restore the connection by itself.
If the station cannot decide which device to use, or the connection fails, a configuration screen is shown.
The station can connect directly to the inverter dongle WiFi, or it can join your home WiFi and find the inverter there (or use a manually entered IP address).
Direct connection
The station connects directly to the WiFi network broadcast by the inverter dongle. The table below shows what to fill in for each inverter type.
| Connection | WiFi | Password | IP | Serial number |
|---|---|---|---|---|
| Solax | Wifi_XXXXXX | Leave empty | Leave empty | Ignored |
| GoodWe | Solar-WiFi-XXXXXX | Default: 12345678 | Leave empty | Ignored |
| Victron | venus-XXXXXX | On dongle label | Leave empty | Ignored |
| Sofar | AP_XXXXXX | On dongle label | Leave empty | Dongle SN: XXXXXX |
| DEYE | AP_XXXXXX | On dongle label | Leave empty | Dongle SN: XXXXXX |
| GROWATT SPH | XGD-XXXXXX | Default: 12345678 | Leave empty | Ignored |
Connection via home WiFi
If you want to connect the station to your home WiFi network, enter the network name and password. The station will join your home network and then find the inverter there (or use the IP address you enter).
The table below shows what to fill in for each inverter.
| Connection | WiFi | Password | Inverter IP | Inverter SN |
|---|---|---|---|---|
| Solax | Your WiFi | Your password | Leave empty or enter IP | Ignored |
| GoodWe | Your WiFi | Your password | Leave empty or enter IP | Ignored |
| Victron | Your WiFi | Your password | Leave empty or enter IP | Ignored |
| Sofar | Your WiFi | Your password | Leave empty or enter IP | Dongle SN (XXXXXX from AP_XXXXXX), used as password |
| DEYE | Your WiFi | Your password | Leave empty or enter IP | Dongle SN (XXXXXX from AP_XXXXXX), used as password |
| GROWATT SPH | Your WiFi | Your password | Enter IP address (find it in your router) | Leave empty |
Supported inverters
SOLAX
SOLAR STATION Live usually connects to SOLAX automatically with default settings. If it does not, follow these steps:
- Check if the WiFi network Wifi_XXXXXX (dongle WiFi) is visible. If not, it might be hidden – disable SSID hiding in the SOLAX Cloud mobile app (Menu → Settings → Network → Pocket WiFi SSID Broadcast).
- The dongle WiFi is open (no WiFi password), but the API access is protected. The default API password is printed on the dongle label and starts with the letter “S”.
GOODWE
- Check that WiFi network Solar-WiFi-XXXXXX (XXXXXX = dongle serial number) is visible. The default password is 12345678.
- If the dongle is not visible, press the dongle button briefly (1 s) to reset it and wait about 3 minutes for it to restart.
VICTRON
Victron broadcasts a WiFi network venus-XXXXXX (XXXXXX = device serial). The password is printed on the label.
For proper operation you must enable Modbus TCP in the menu (Menu → Settings → Services → Modbus TCP).
SOFAR
Sofar inverter broadcasts a WiFi network AP_XXXXXX (XXXXXX = dongle serial number). The password is printed on the dongle label.
You must enter the dongle serial number (XXXXXX from the WiFi network name AP_XXXXXX). The station communicates via V5TCP protocol on port 8899.
GROWATT SPH
You must update the firmware of your Shine WiFi-X dongle. Firmware version 3.1.1.1 or newer is required, with Modbus TCP enabled. With older firmware the station will not work.
The update is done via the ShinePhone app. Proceed as if you were changing the WiFi network for the dongle. During the process, the app will offer a firmware update – confirm it. Video tutorial (YouTube).
Unfortunately, the WiFi dongle does not provide any auto-discovery for its IP address in your LAN, unlike some other inverters. You must enter the IP of your Shine WiFi-X dongle into the station manually. You can find it in your router device list – it usually appears as a device named “Espressif”.
SOLAR PLUG
SOLAR STATION Live creates its own WiFi network (SoftAP) to which the sockets connect. The sockets communicate exclusively with the station – they are not available in the Shelly cloud, the Shelly app, or any other network. The station is the sole controller of the sockets.
Supported sockets
| Model | WiFi prefix (during pairing) |
|---|---|
| Shelly Plug S | shellyplug-s- |
| Shelly Plug | shellyplug- |
| Shelly Plus Plug S | ShellyPlusPlugS- / PlusPlugS- |
| Shelly Plug S Gen3 | ShellyPlugSG3- |
| Shelly Plug M Gen3 | ShellyPlugMG3- |
| Shelly Pro 1PM | ShellyPro1PM- / Pro1PM- |
| Shelly Plus 1PM | ShellyPlus1PM- / Plus1PM- |
| Shelly 1PM Gen3 | Shelly1PMG3- |
| Shelly Pro 3 | ShellyPro3- / Pro3- |
| Shelly Pro Dimmer 1PM | ShellyProDM1PM- |
| Shelly Dimmer Gen3 | Shelly0110DimG3- |
| Shelly 1 Mini Gen3 | Shelly1MiniG3- |
Pairing
On first power-up, the socket enters pairing mode – it broadcasts an open WiFi network with the prefix listed above. You can trigger pairing at any time by holding the button on the socket for 10 seconds (the blue LED will light up).
SOLAR STATION Live automatically searches for these WiFi networks, connects to the socket and configures it to join the station's own network (SoftAP). During configuration, the LED colour indicates the state:
- Blue: pairing mode active
- Red: configuration in progress
- Orange: device successfully configured and active
After successful pairing, the socket appears in the household consumption tile. Up to 8 sockets can be connected to the station.
Socket switching
SOLAR STATION Live controls sockets automatically according to internal rules. No manual configuration is required. The energy balance is monitored and the home battery is prioritised. As soon as the battery is charged and/or there are PV surpluses, the station starts switching sockets on in a cascade. Each socket stays on for at least 5 minutes.
You can turn the socket on manually with its button – in that case automatic control is temporarily disabled. To re-enable automatic control, simply turn the socket off with the button again.
With a socket switched on, some power may be taken from the battery, but never for more than the 5-minute minimum. In borderline PV conditions the station will cycle sockets on and off to maximise the use of PV energy.
EcoVolter PRO (2nd generation)
EcoVolter PRO (2nd generation) is fully compatible with SOLAR STATION Live.
Dynamic charging power control – SMART mode – is supported.
SOLAR STATION Live will find EcoVolter PRO automatically if both are connected to the same WiFi network. For this you must have the station connected to your inverter via your home WiFi.
After pairing ECOVOLTER PRO (2nd generation), a new tile appears on the display with a switch. When you enable SMART mode on this tile, the station automatically optimises charging power according to the current household energy balance.
In SMART mode some battery energy may be used for charging, but at least 80 % of your home battery capacity is always kept in reserve.
Solax Wallbox
Solax Wallbox is fully compatible with SOLAR STATION Live.
Dynamic charging power control – SMART mode – is supported.
SOLAR STATION Live will find the Solax Wallbox automatically if both are connected to the same WiFi network. For this you must have the station connected to your inverter via your home WiFi.
After pairing with the Solax Wallbox, a new tile appears on the display with a switch. When you enable SMART mode on this tile, the station automatically optimises charging power according to the current household energy balance.
In SMART mode some battery energy may be used for charging, but at least 80 % of your home battery capacity is always kept in reserve.


